


Table of contents
Hey, welcome here😍! We are going to learn simple concepts about blockchain and by the end of today, you will get to have knowledge about the underlying tech used in cryptocurrency, digital assets etc.
Well, Blockchain is not just a bubble but it is real tech that I believe will transform the current Web.
If you are totally new to this technology, I would recommend you to get a quick intro from my article here.
 In this article, we shall use simple Python libraries to simulate a simple blockchain. You don't need to be an expert to understand the code, I will assume you have simple Python basics and a little familiarity with Python classes.
Let's get the ball rolling by seeing which package we shall be using mainly and in order to keep this at a basic and concept (elementary) level, I will be using Python lists instead of the JSON format used in blockchain.
🔹 hashlib
This module implements a common interface to many different secure hash and message digest algorithms. Included are the FIPS secure hash algorithms SHA1, SHA224, SHA256, SHA384, and SHA512.
The terms “secure hash” and “message digest” are interchangeable. Older algorithms were called message digests. The modern term is secure hash.
Read More.
Blockchains make use of two types of cryptographic algorithms, asymmetric-key algorithms, and hash functions. Hash functions are used to provide the functionality of a single view of blockchain to every participant.
Blockchains generally use the SHA-256 hashing algorithm as their hash function.
hashlib module is installed by default and already included in the Python library and we don't need to pip install anything.
First go to the terminal to play with hashlib;
import hashlib as hs
Since I don't want to spoon feed you. Type the following in the snip and you should get the result;
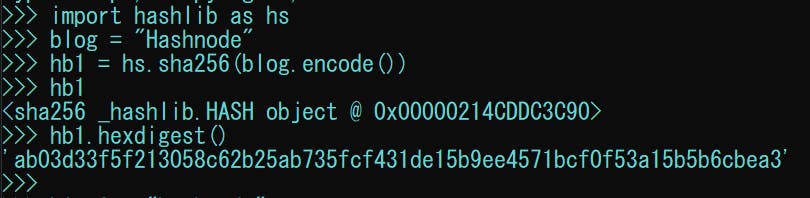 As we can see, a
 sha256 object was created when we called the first line and the encode() method helps us in encoding to that particular sha algorithm specified;
Then the hexdigest() returns the encoded data into hexadecimal format from the object.
So if we tilted our blog variable or created a new one which is blog2 = "hashnode" instead of capital"H".
Let's see the difference;
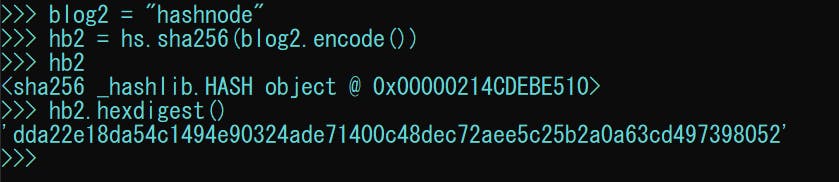 As you can see the first hex is different from the second one and this shows you how powerful the
 hashlib is and any slight change can alter the results significantly.
Now let's get off the terminal, we create a blogchain.py file. I am calling my file blogchain because we shall call our blockchain Blogchain 😎.
At the core of blockchains, we have blocks linked together to form a chain. So let's begin by defining a block that we shall name BlogBlockToken and we shall create be instantiating Tokens directly.
Read more about Crypto Tokens.
class BlogBlockToken:

    def __init__(self, previous_block_hash, transaction_list):

        self.previous_block_hash = previous_block_hash
        self.transaction_list = transaction_list

        self.block_data = f"{' <-> '.join(transaction_list)} <-> {previous_block_hash}"
        self.block_hash = hashlib.sha256(self.block_data.encode()).hexdigest()
We created a class named BlogBlockToken, a wrapper for objects that will have certain characteristics (attributes) and behaviours (methods).
Then we define the __init__ method (also named constructor), which gets invoked each time an instance is created of the token.
This method has three parameters 🚀:
💨 self (the instance of each object)
💨 previous_block_hash (a reference to the previous block)
💨 transaction_list (a list of transactions made in the current block).
We store the previous hash and transaction list and create an instance variable block_data as a string.
Now, this doesn’t happen with real cryptocurrencies, in which we store that kind of data as another hash, but for simplicity purposes, we’ll store every block of data as a string.
Finally, we create the block_hash, which other blocks will use to continue the chain. Here’s where hashlib comes in handy; instead of creating a custom hash function, we can use the pre-built sha256 to make immutable blocks.
This function receives encoded strings (or bytes) as parameters. That’s why we’re using the block_data.encode() method. After that, we call hexdigest() to return the encoded data into hexadecimal format.
Now let's define our chain class (Blogchain) that will hold our BlogBlocks together in a chain.
class Blogchain:
    def __init__(self):
        self.chain = []
        self.generate_genesis_block()
The above code simply generates our first block which is referred to as the Genesis Block
We also create a chain list variable.
Now let's create that generate_genesis_block() function under neath.
def generate_genesis_block(self):
        self.chain.append(BlogBlockToken("0", ['Genesis Block']))
Now let's create a function that will help us with chaining block transactions;
def create_block_from_transaction(self, transaction_list):
        previous_block_hash = self.last_block.block_hash
        self.chain.append(BlogBlockToken(previous_block_hash, transaction_list))
So it allows us to append blocks to the chain with just a list of transactions.
Now, what if we want to be able to see this ledger of transactions;
def display_chain(self):
        for i in range(len(self.chain)):
            print(f"Data {i + 1}: {self.chain[i].block_data}")
            print(f"Hash {i + 1}: {self.chain[i].block_hash}")
            print("----------------------------------"
                  "\----------------------------------")
We loop through the different blocs in the chain and be able to publically display them something like a Block Explorer
Lastly, let's also be able to read the last element in the chain;
@property
    def last_block(self):
        return self.chain[-1]
Now in the real blockchain, there is more to this.
Let's test our Blogchain by instantiating BlogBlock transactions from it.
t1 = "George sends 3.1 BBT to Joe"
t2 = "Joe sends 2.5 BBT to Alice"
t3 = "Alice sends 1.2 BBT to Bob"
t4 = "Bob sends 0.5 BBT to Charlie"
t5 = "Charlie sends BBT GC to David"
t6 = "David sends 0.1 BBT to Eric"
Those are 6 different transactions we have assumed using our BBT (BlogBlockTokens) assuming that we had some mined already or created initially.
my_blogchain = Blogchain()

my_blogchain.create_block_from_transaction([t1, t2])
my_blogchain.create_block_from_transaction([t3, t4])
my_blogchain.create_block_from_transaction([t5, t6])
Finally, let's display our Blogchain.
my_blogchain.display_chain()
This means our entire code looks like this;
import hashlib

class BlogBlockToken:

    def __init__(self, previous_block_hash, transaction_list):

        self.previous_block_hash = previous_block_hash
        self.transaction_list = transaction_list

        self.block_data = f"{' <-> '.join(transaction_list)} <-> {previous_block_hash}"
        self.block_hash = hashlib.sha256(self.block_data.encode()).hexdigest()

class Blogchain:
    def __init__(self):
        self.chain = []
        self.generate_genesis_block()

    def generate_genesis_block(self):
        self.chain.append(BlogBlockToken("0", ['Genesis Block']))

    def create_block_from_transaction(self, transaction_list):
        previous_block_hash = self.last_block.block_hash
        self.chain.append(BlogBlockToken(previous_block_hash, transaction_list))

    def display_chain(self):
        for i in range(len(self.chain)):
            print(f"Data {i + 1}: {self.chain[i].block_data}")
            print(f"Hash {i + 1}: {self.chain[i].block_hash}")
            print("----------------------------------"
                  "\----------------------------------")

    @property
    def last_block(self):
        return self.chain[-1]

t1 = "George sends 3.1 BBT to Joe"
t2 = "Joe sends 2.5 BBT to Alice"
t3 = "Alice sends 1.2 BBT to Bob"
t4 = "Bob sends 0.5 BBT to Charlie"
t5 = "Charlie sends BBT GC to David"
t6 = "David sends 0.1 BBT to Eric"

my_blogchain = Blogchain()

my_blogchain.create_block_from_transaction([t1, t2])
my_blogchain.create_block_from_transaction([t3, t4])
my_blogchain.create_block_from_transaction([t5, t6])

my_blogchain.display_chain()
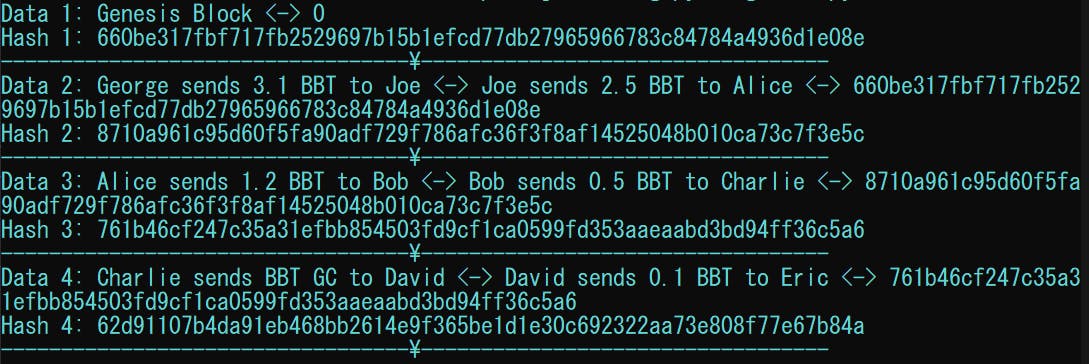
If we run our file, we would get something similar to this;
That's it!
You now have a concept of how blockchains work and you are ready to start understanding real projects before moving on to building with blockchain technologies.
Find the full code here.
🔹 Conclusion
Once again, hope you learned something today from my little closet.
Please consider subscribing or following me for related content, especially about Tech, Python & General Programming.
You can show extra love by buying me a coffee to support this free content and I am also open to partnerships, technical writing roles, collaborations and Python-related training or roles.
 📢 You can also follow me on Twitter : ♥ ♥ Waiting for you! 🙂